Polub na facebook'u

niedziela, 28 kwietnia 2013

Tea time, czyli jak odkryliśmy forniry/ Tea time- a story about discovering veneers

Podwieczorek/Tea time


Po debiucie z tutorial’em Kriss'a miałam ochotę wypłynąć na szerokie wody i zrobić coś według własnego projektu. Mój wybór padł na stół i krzesła kuchenne. W internecie znalazłam kształt krzeseł, który mi się podobał. Uzbrojona w metr wkroczyłam do własnej kuchni w skali 1:1 i wymierzyłam krzesła, wymiary podzieliłam na 12 i naszkicowałam. Do malowania wybrałam biały, matowy lakier w sprayu.


Muza w skali 1:1/ My muse in the 1:1 scale


After the debut with Kriss’s tutorial, I wanted to make something according to my own design. My choice was the kitchen table and chairs. In the Internet, I found the shape of the chairs, which I liked. Armed with tailor meter, I stepped into the 1:1 scale and checked the size of the chairs. I did a sketch in 1/12th scale. I painted finished chairs with white, matt, lacquer spray.


Przy stole się rozkręciłam. Zresztą na blogach naoglądałam się cudów, które robią inni i chciałam być jak oni :D. Jak jednak zrobić np. elementy wypukłe jeśli nie umie się rzeźbić? Tutaj pomocna okazała się szpachla akrylowa. Gotowy stół był jednak jakiś nudny. Całość zlewała się w jedną wielką białą plamę. I tutaj aniołem stróżem jak zwykle okazał się Arek- uświadomił mi, że na świecie istnieje coś takiego jak forniry. Jak się okazało ich skrawki wielkości A4, można kupić np. na allegro za grosze. Stół ozdobiony blatem od razu nabrał charakteru.


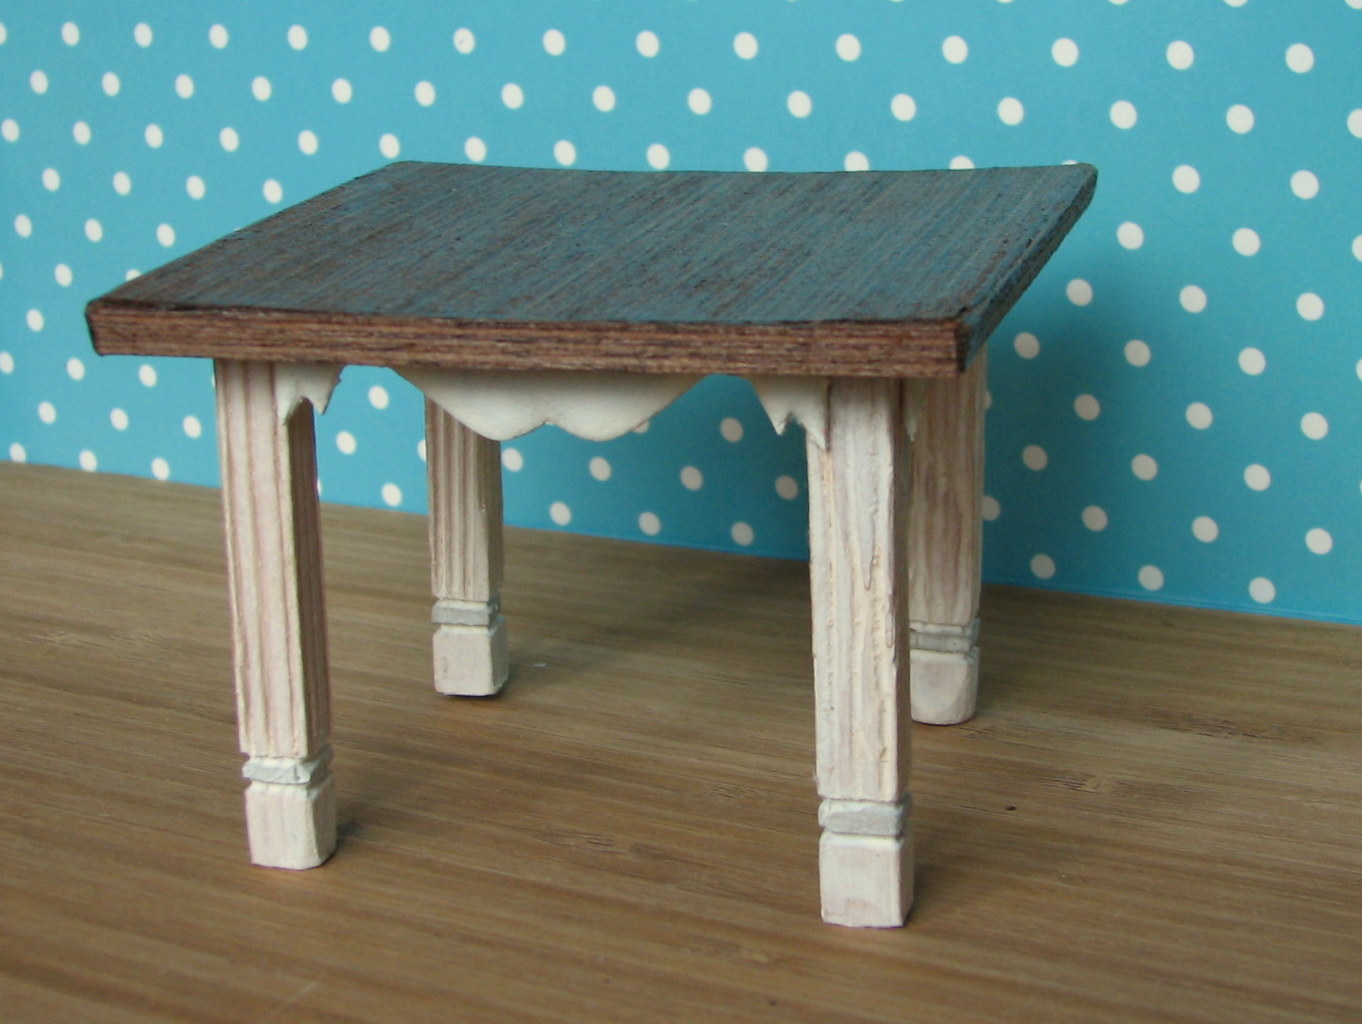
With a table I hitted up. Besides, at  blogs I saw all those wonders that others do, and I wanted to make something simillar:D.  But how to do convex shapes when you don’t know how to carve? And this is how I discovered acrylic wood filler.
Unfortunately ready  table was... kind of  boring.  And here he was, my guardian angel- Arek ;). He made ​​me realize that in the world there are such wonderful things as for example veneers. As it turned out the pieces of A4 size are avaliable on ebay  for pennies. The table top  decorated with one looked much better.


Zastawa i jedzonko niestety kupne. Kiedyś pewnie weźmiemy się i za to. Łyżeczki i widelczyki to charmsy. Podstawka pod tort mojego pomysłu&roboty, ale o tym kiedy indziej.
Unfortunately tableware and food were not made by us. But who knows, maybe one day we’ll make them. Spoons and forks are charms. The cake stand- design&realization- I.


Pierwszy kredens i złote rady/ First dresser and golden tips


Zaopatrzeni w sklejkę ze sklepu modelarskiego (grubość 1mm), uniwersalny klej Dragon (nie polecam- po jakimś czasie mebelki się rozklejają:(,  lakierobejcę w kolorze kasztanowym oraz mnóstwo zapału przystąpiliśmy do działania. Ponieważ początki bywają trudne, postanowiliśmy skorzystać z gotowego tutorialu. Googl’ując trafiłam na fantastycznego bloga pełnego opisów jak krok po kroku wykonać miniaturki. Nasz wybór padł na kuchenny kredens.
Kredens Kriss'a/Kriss's dresser


Equipped with mat board from the hobby store (1mm thick), universal glue  (not recommended-after a while it unstick: (chestnut-colored varnish and lots of enthusiasm we started to work. Because beginnings are difficult, we decided to use a tutorial. Googling I found a fantastic blog full  of descriptions and step-by-step descriptions. Our choice was the kitchen dresser.


W naszym wykonaniu wygląda to tak:
Made by us it looks like this:


Mam kilka przemyśleń, które Arek jako rasowy majsterkowicz uważałby pewnie za ujmę, ale co tam. Porady cioci Basi:
  • Mebelki najlepiej robić ze sklejki, którą kupuje się w sklepach modelarskich. Osobiście uważam, że do skali 1:12 najwygodniej pracuje się z grubością 1mm. Jeśli planujemy rzucić się w wir konstruowania można zorientować się, czy większe ilości nie wyjdą taniej ze sklepów wysyłkowych.
  • Warto dokładnie przegrzebać sklep modelarski/Castoramę/osiedlowy sklepik majsterkowicza. Sprzedawcy dziwnie się patrzą, ale za to ile skarbów można znaleźć!
  • Są różne sposoby na uchwyty do szafek- zmodyfikowane koraliki, dogięty drut, mini-rurki, czy już nawet dostępne są gotowe miniaturowe uchwyty (np. domkowa4.pl).
  • Niech żyje cierpliwość. Jeśli nie korzystamy z tutorialu, który prowadzi nas za rękę mebelek trzeba wcześniej zaprojektować i przemyśleć jego konstrukcję (no chyba, że składa się z dwóch ścianek). Po wycięciu elementów ich brzegi trzeba wygładzić papierem ściernym. Każdy element trzeba pomalować oddzielnie, a dopiero potem kleić.
  • Lekiery/lekierobejce i inne mazidła lepiej wypróbować na jakimś małym fragmencie. To co piękne na zdjęciu i w puszce, na sklejce może wyglądać już koszmarnie. Wiem, co mówię;).


I have a few thoughts. I guess, Arek as skilled handyman probably would die from a shame if he ever read them but ...shush!.
Tips from aunt Barbara:
  • In my opinion for making miniatures the best is a mat board from hobby stores.  I think in the scale of 1/12th it’s easiest to work with 1mm thickness. If you are planning to be a busy constructor consider buying  larger amounts online (it can be cheaper this way) .
  • You should do a little treasure haunt in a hobby store / Castorama / housing estate DIY store. Sellers may look at you strangely, but trophies are worth the effort.
  • There are different ways of making handles for your pieces of furniture.  Modified beads, wires, elements of jewllery  or not even  ready-made miniature handles are available.
  • It hurts but be patient! If you do not use the tutorial that leads you step-by-step make a design first structure (unless it consists of two walls). After cutting the parts always smooth the edges with sandpaper. Each item must paint separately and then glued (don’t do it other way round!).
  • Varnishes / mordants  and other paints  try  first  on a small area. Some of them are beautiful in the picture and incan but they are going to change your furniture into a nightmare. I know what I'm saying;).


czwartek, 11 kwietnia 2013

Początek / The beginning


Moje marzenie pewnie jeszcze długo pozostałoby niezrealizowane, gdyby w moim życiu nie pojawił się …odpowiedni mężczyzna :D. Jakkolwiek mam dużą smykałkę do majsterkowania i wszelkiego rękodzieła, niektóre problemy techniczne niestety mnie przerastają. Z Arkiem udało nam się stworzyć idealny zespół, bo każde uzupełnia braki drugiego. Obecnie wiem co to lakierobejca, fornir, jak się używa suwmiarki (niby proste, ale podchwytliwe;), a jak tnie piłą włośnicową.  Arek z kolei czuje się usatysfakcjonowany rozwiązując problemy takie jak np. stworzenie 4 mm funkcjonalnych zawiasów, które na dodatek mają jeszcze ładnie wyglądać.

Szukając inspiracji w internecie dowiedziałam się też, że fanatyków miniatur jest na świecie całe mnóstwo. Jakkolwiek w Polsce to hobby nie stało się jeszcze tak popularne jak np. w Anglii, my też mamy bazę wielu bardzo profesjonalnych stron i blogów.

Ponieważ sama wiele się dowiedziałam odwiedzając strony i blogi innych, chciałabym się teraz odwdzięczyć i podzielić moimi doświadczeniami oraz pomysłami. Gdyby się uprzeć mogłabym zamówić wszystko włącznie z domkiem (abstrahując oczywiście od aspektu finansowego), ale przecież nie o to chodzi. „Drogi są dla podróży a nie dla celu”!:)


Ryc. Jadalnia z Queen Mary's Dolls' House.


Every dream has a beginning. I owe mine to my mom, who didn’t  want to buy me a house for Barbie (Mom, thank you !;). When I was 6 or 7 years old, armed with a set of small kit craft (mini saw, a hammer and some other tools) I went to the basement searching for materials. Then I constructed my first dollhouse. It was not perfect, and now is dusting in the attic. But the whole thing showed that, I can achieve whatever I want.
A few years later I went on exchange to England.  There, in Windsor Castle, I saw a real miracle, the Queens Mary Doll House. Although looking at it you could fall into despair (the degree of craftsmanship not reachable by even the best "miniaturists" in the world) Queen’s Mary dollhouse sparks the imagination. What's more, that's when I learned that Dollhouses are not only for children. There are professional shops where you can buy accessories for them and some of them cost an arm and a leg. The castle in medieval style, Louis XV pieces of  furniture, or rustical tea set? No problem.

My dream probably would have remained unrealized for a long, long time, if it wasn’t for ... the right man:D. Although I have a knack for tinkering and any handicraft, but unfortunately, some technical problems are just beyond me. With Arek, we’ve managed to create the perfect team, because each complements the deficiencies of the other. Now I know what is stain, veneer, calliper and many other tricky things. On the other hand, Arek feels satisfied solving problems such as the creation of 4 mm-hinges, which are not only functional but also esthetic.
<!--[if !supportLineBreakNewLine]-->
<!--[endif]-->
Looking for inspiration internet I have acknowlede that world is full of miniatures-enthusiasts. Although in Poland, the hobby has not yet become as popular as for example in England, we also have a great many of professional websites and blogs and I’ve learned a lot by visiting them. Now I would like to  give something back and share my experiences and ideas. Well,  I could order everything including  the house, but what's the point? "It’s not the destination, but a journey " :)